Showing posts with label christmas. Show all posts

Monday, December 26, 2011

Chicken and Goat Cheese Quiche


This quiche was one of the recipes I made for Christmas Dinner (lunch). I have a couple of varieties I make of this style quiche, but this was the first in which I used goat cheese. I loved the creaminess it added to the recipe, and I will be using it again in the future. It worked very well. This also reheats well in a toaster oven, & we had it again this morning for brunch. Enjoy.


Goat Cheese and Chicken Quiche


2 frozen deep dish Pie Crusts (or homemade pie crust)

1 diced yellow Onion

2  boneless Chicken breasts-chopped finely

2 tablespoons Olive oil

½ cup Sour cream

2 teaspoons Butter

1/2 tsp. Nature's Seasoning

1/2 cup Parmesan cheese

1 cup Mozzarella

1/8 cup Goat cheese   

1/8 cup fresh flat leaf Parsley-chopped

½ cup fresh Basil-minced

8 eggs

1 cup heavy Cream

Salt & Pepper to taste


Directions:

Over medium heat, sauté olive oil, 2 tablespoons of butter, basil, parsley, and onions till golden brown. Add chicken, salt, pepper, and Nature’s Seasoning. Cook until well done & chicken is cooked through (about 7 minutes total). Remove from heat & set aside.

Whisk together eggs, crumble goat cheese & add the remaining ingredients. Whisk together. , & add chicken.  Split the mixture between 2 pie crusts. Bake at 375 for about 40 minutes. Cover edges of pie crust with egg wash, to prevent burning.


Roasted Herbed Rack of Lamb

We had a rack of Lamb I've been saving for a special occasion, & Christmas dinner felt like a perfect time. This was my very first time, & I can say I would have opted to cook it a little longer (its a little too pink for me). Which I ended up doing for an extra 5 minutes. It ended up being done with a little pink spot in the middle. The crust was Ahh-maZING! Try it. You will LOVE it!


Roasted Herbed Rack of Lamb


Ingredient:

2-3 large Garlic cloves

½ cup chopped fresh Basil

½ cup freshly grated Romano cheese

1/3 cup Italian seasoned breadcrumbs

2 tablespoons herbs de Provence*

1 & ½ tablespoons Dijon mustard

2 & ½ tablespoons olive oil

1 teaspoon Salt

1 /2 teaspoon pepper

1 &1/2-pound rack of lamb, trimmed


Directions:

Mince garlic in processor. Add basil, olive oil, salt, pepper, herbs de Provence, Dijon, and Romano. Pulse in food processor until all ingredients are smooth & come together in a paste. The paste can be made ahead of time. Chill until ready to use.


Preheat oven to 425°F. Sprinkle lamb with salt and pepper. Arrange, bone side down, on small rimmed baking sheet. Press breadcrumb mixture onto lamb, coating completely. Roast until meat thermometer inserted into center of lamb registers 135°F for medium-rare, about 30 minutes. Let lamb rest 15 minutes. Transfer lamb to cutting board. Cut between bones into individual or double chops.


Thursday, December 22, 2011

White Chocolate-Macadamia Nut Cookies


White Chocolate-Macadamia Nut Cookies


Ingredients

·    3/4 cup butter-at room temperature

·    3/4 cup white sugar

·    3/4 cup brown sugar

·    2 eggs

·    2 teaspoons pure Vanilla

·    2 tablespoons dark Rum

·    2 1/4 cups all-purpose flour

·    1 teaspoon baking soda

·    1 teaspoon Salt

·    1 cup Macadamia nuts

·    2 cups white Chocolate or good quality Vanilla baking chips

Directions

In a large bowl cream together the butter and sugars. Beat in the eggs, rum and vanilla.


In a separate bowl, combine the flour, salt and baking soda. Gradually add the dry ingredients to the wet ingredients and mix well.


Lastly add in the macadamia nuts and white chocolate chips. Chill dough in freezer for about 15-20 minutes. Using a tablespoon measure out a large rounded size spoonful, and place onto a greased baking sheet.


Bake at 375°F for 8 minutes. Cook on pan for 1 minute, then transfer to a wire rack to cool completely.


Wednesday, December 21, 2011

Candycane Vodka.......More DIY Gifts


I've seen a couple variations of this on Pinterest & http://www.scarymommy.com/ so I decided to try it myself. It looked so simple & perfect to pair with our Christmas boxes of Peppermint Bark , White Chocolate Macadamia Nut Cookies (Posting coming soon) & Cranberry-White Chocolate Cookies !

I also made a variation of this Vodka to be used to make Martinis: Spiced Ginger Pear Vodka..Mmmmmmm! Check out the recipe for Candycane Vodka,  & Spiced Ginger-Pear Vodka


CandyCane Vodka


Ingredients:

1 large Quart jar (also used for jarring or canning) with combining lid

1 package Red & White Striped Candy canes (don’t use the ones with green or it will come out with a strange hue

A couple drops Peppermint Extract

Good Quality Vodka


Directions:

Peel your candy canes & place into vodka. Add a couple of drops of the peppermint extract, shake, place lid on & tighten. Place into a cool & dry area for about a week. Shake well every few days. Serve chilled over ice, or use in a martini or mixed drink.


Monday, December 19, 2011

Dark & White Chocolate Peppermint Bark....DIY Gifts!


I may still be wearing the P.J's I woke up in yesterday, which is the down side......but that's not important. The UP side is that I spent almost the entire weekend baking, and making DIY Christmas gifts for our friends & co-workers on base. In order to do that, I had to make some sacrifices, mainly-showering. But just to re-assure everyone that will be receiving a DIY gift from me, I showered the night before I started, so that technically counts!

After I made these, I packed them all up in the cutest Martha Stewart Treat boxes, which I found in a set that comes with ribbon, box, tissue paper & even a label...can't beat that! Not to mention that Christmas stuff at Michael's is the B.O.M.B.!

Enjoy....


Dark and White Chocolate Peppermint Bark


Ingredients:

1 & ½ bags high quality dark Chocolate chips

1 & ½ bags high quality White Chocolate chips

3 teaspoons real Peppermint Extract (divided)

1 box Candy canes (individually wrapped)

Wax paper

Non-stick spray

A large cookie sheet with no edge

A freezer (lol)

Directions:

Melt dark chocolate chips over a water bath on medium-low heat. Once melted mix in 1 teaspoon peppermint extract, mixing well until well combined. On a cookie sheet, cover with wax paper, then spray lightly with non-stick spray. Pour the melted chocolate evenly across the sheet, spreading with a spatula to coat evenly. Place into the freezer immediately.


Melt white chocolate chips over a water bath on medium-low heat. Once melted mix in 2 teaspoons peppermint extract, mixing well until well combined. Remove cookie sheet with dark chocolate from freezer, & pour white chocolate over the top, spreading quickly and evenly. Take care not to overwork the chocolate as it will begin to melt the darker layer underneath. Immediately sprinkle with crushed candy canes & place back into the freezer overnight.


The next day: Remove bark from freezer, & cut into sections by splitting with the tip of a sharp knife. The bark should break into pieces. Store in fridge or in a zip lock bag for up to 2 weeks.

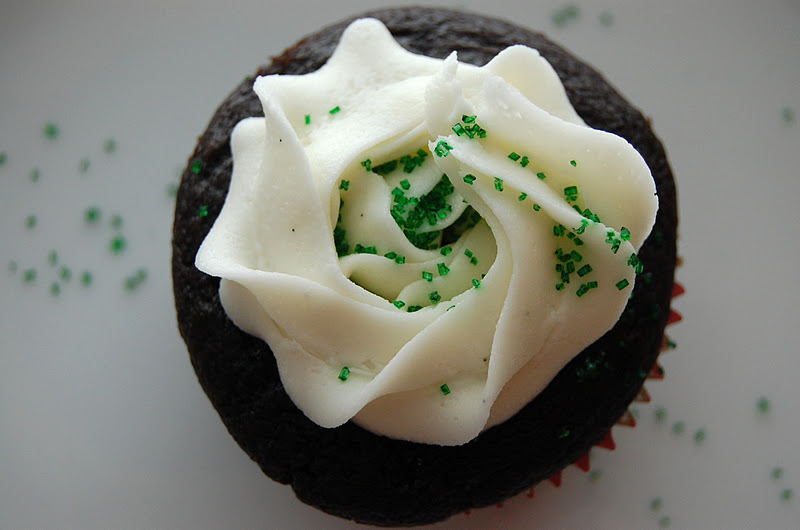
Chocolate Peppermint Cupcakes with Vanilla Bean Icing


Chocolate Peppermint Cupcakes with Vanilla Bean Icing

Ingredients
1 3/4 cups all-purpose flour
2 cups sugar
3/4 cups cocoa powder
2 teaspoons baking soda
1 teaspoon baking powder
1 teaspoon kosher salt
1 cup buttermilk
1/2 cup (1 stick) butter-room temperature
2 large eggs, at room temperature
2 teaspoons pure peppermint extract
1 cup semi-sweet chocolate chips (melted)


Directions
1. Preheat the oven to 350 degrees F. Line standard muffin tins with paper liners; set aside.

2. Sift the flour, cocoa, baking soda, baking powder, and salt into the bowl of an electric mixer fitted with a paddle attachment and mix on low speed until combined. In another bowl, cream butter and sugar together until well combined. Add the buttermilk, eggs, and peppermint extract. Melt chocolate chips, and add orange essence. With the mixer on low speed, slowly add the wet ingredients to the dry. With mixer still on low, add the melted chocolate and stir just to combine, scraping the bottom of the bowl with a rubber spatula.

3. Using a large scoop, distribute the batter between 24 muffin wells, filling each well 2/3 full. Bake for 14-15 minutes, or until a cake tester comes out clean. Cool in the pans for 10 minutes, then remove to a cooling rack and cool completely.


Chocolate-Caramel Cupcakes with Vanilla Bean Frosting


Chocolate-Caramel Cupcakes with Vanilla Bean Frosting


For the cupcakes:

1 & 3/4 cups all-purpose flour

3/4 cups high quality cocoa powder

2 teaspoons baking soda

1 teaspoon baking powder

1 teaspoon kosher salt

1 cup buttermilk, shaken

1/2 cup butter-softened to room temperature

2 cups sugar

2 large eggs, at room temperature

2 teaspoons pure vanilla extract

1/2 cup homemade Caramel

½ cup freshly brewed hot coffee


For the Caramel Filling:

**See my recipe for Salted caramel sauce


For the Frosting:

2 sticks butter, softened to room temperature

2 pounds confectioners’ sugar, sifted

Seeds/pulp of ½ of one vanilla bean

1 tablespoon whole cream-adjust upward to obtain the desired consistency


Directions: For the cupcakes

1. Preheat the oven to 350 degrees F. Line standard muffin tins with paper liners; set aside.


2. Sift the flour, cocoa, baking soda, baking powder, and salt into a medium sized bowl, and then set aside. In the bowl of an electric mixer fitted with a paddle attachment, combine the buttermilk, salted caramel, sugar, butter, eggs, and vanilla and mix on low speed until combined. With the mixer on low speed, slowly add the wet ingredients to the dry. With mixer still on low, add the coffee and stir just to combine, scraping the bottom of the bowl with a rubber spatula.


3. Using a large scoop, distribute the batter between 24 muffin wells, filling each well 2/3 full. Bake for 18 to 22 minutes, or until a cake tester comes out clean. Cool in the pans for 10 minutes, then remove to a cooling rack and cool completely.


4. With a very small spoon, dig out a circular well in the center of the cupcake. Then fill the center either by piping the cooled salted caramel into the well, or with a teaspoon. Finish by frosting with vanilla frosting.

For the Icing

In a large mixer, combine the sticks of butter, vanilla, and confection sugar gradually. Slowly add cream until you reach the desired consistency.


**Adapted from a Mybakingaddiction recipe

Thursday, December 8, 2011

Bag-O-Cookies

I made the previous recipe - Cranberry-White Chocolate cookies for my hubby's office. I used three types of ribbon,and candy canes, tied around clear confection bags to store the cookies.


Cranberry White Chocolate Chip Cookies


Cranberry White Chocolate Chip Cookies


Ingredients

·    3/4 cup butter-at room temperature  

·    3/4 cup white sugar

·    1/2 cup brown sugar

·    2 eggs

·    2 teaspoons pure Vanilla

·    2 tablespoons Cointreau

·    2 1/4 cups all-purpose flour

·    1 teaspoon baking soda

·    1 teaspoon Salt

·    ½ teaspoon Nutmeg

·    1 cup dried cranberries

·    2 cups white Chocolate or good quality Vanilla baking chips


Instructions:

In a large bowl cream together the butter and sugars. Beat in the eggs, Cointreau and vanilla.


In a separate bowl, combine the flour, nutmeg, salt and baking soda. Gradually add the dry ingredients to the wet ingredients and mix well.


Lastly add in the dried cranberries and white chocolate chips. Using a tablespoon measure out a large rounded size spoonful, and place onto a greased baking sheet.

 Then.....Lick the scraper or whisk attachment, close your eyes, then savor the moment! (Then worry about salmonella poisoning)! Eek!


Bake at 375°F for 8 minutes. Cook on pan for 1 minute, then transfer to a wire rack to cool completely.

Then............take a bite!


Sunday, November 6, 2011

Dark Rum Chocolate Cake Balls


Dark Rum Chocolate Cake Balls


(Can also be used to make cake pops)

Cake Balls:

1 box Betty Crocker Super Moist Chocolate Fudge cake Mix

(any ingredients called for by cake mix directions)

½ cup Dark Rum or Kahlua (I used Kahlua last time & it was great) which you will substitute for ½ cup of the water called for in the cake mix

1 teaspoon pure Vanilla

Icing (use the recipe below or you can always use 1 cup pre-made, but honestly the one below will make your cake balls much better).


Icing:

4 oz. cream cheese, softened
4 oz. Mascarpone cheese at room temperature

1/3 stick unsalted butter, room temperature
1 cup confectioners’ sugar
¼ cup Honey

1 tablespoon dark Rum


Coating:

1 large package chocolate Almond Bark-Melted (I also used a vanilla flavored candy coating for the white cake balls, which can be colored with Wilton’s gel edible food coloring for variety).

Any other sprinkles or decorations you would like to add.


Directions:

Preheat oven as directed. Follow cake directions on the back of your box, but reduce water & add additional ingredients. Bake cake according to directions. Remove & cool on a large rack. Once cooled, remove cake and crumble into fine crumbs in a large mixing bowl, removing any crispy or hard edges.


In a large mixing bowl, cream butter, mascarpone, cream cheese, confection sugar, and honey together. Once combined, add rum. Set aside 1 cup. The remaining icing can be refrigerated and used at a later date. Add icing to cake crumbs, mixing well, until the entire cup of icing has been absorbed by cake. Set into freezer to chill for at least 20 minutes.


Remove and measure out equal scoops of cake mix to obtain uniform measurements for cake balls. Once all of your cake balls are measured, roll and form into smooth balls, and set onto parchment paper, and allow to chill in the freezer while you melt your candy coating or Almond bark. Remove cake balls from freezer, and dip into candy coating. I found that setting each cake ball into the coating, then scooping in onto a fork while the excess coating drips off, then pushing it carefully into the parchment paper with a skewer stick cut in half, was the best technique. Add any sprinkles or decoration now so that it will set. I stored the cake balls in Tupperware overnight, but they are good at room temperature, covered for up to 2 days. Enjoy!