Monday, August 13, 2012

Sate Chicken Skewers

This is BY FAR one of my family's favorite meals. We usually grill this in the summer, then sit outside in the evening and enjoy a delcious meal together. The skewers are healthy, and low in fat, yet highly flavorful. We hope you enjoy it too.


Sate Chicken Skewers with Spicy Peanut Sauce

**Inspired by a Rasa Malaysia Recipe


Ingredients:

2 ½ pounds skinless and boneless chicken breast, sliced into chicken tender sized slices

30 wooden skewers, pre-soaked in water for 30 minutes

2 Cucumbers, sliced

Marinade:

3 tablespoons Fish sauce

4 whole cloves of Garlic

2 teaspoons sweet Soy sauce

1 teaspoon Soy sauce

2.5 teaspoons Coconut or Palm Sugar

1/4 teaspoon white Pepper

1 teaspoon Turmeric

1 teaspoon Coriander

4 tablespoons Red Curry Paste

1 cup Coconut milk

1/8 cup Olive (oil optional)

Peanut Sauce:

2 teaspoons Red Curry paste

2 tablespoons Fish sauce

3 tablespoons Tamarind puree

3 tablespoons creamy Peanut butter

1 tablespoon Palm or Coconut sugar

1 teaspoon paprika powder

2 whole cloves Garlic

2 cups Coconut milk

1 cup crushed Peanuts

Directions:

Prepare the marinade by adding all your ingredients to a blender, blending on high until smooth and creamy.

Slice the chicken breasts, then add to a large zip lock bag, then mix in the Marinade and make sure all pieces are coated. Marinate the meat overnight, or at least 4 hours in a large zip lock bag in the refrigerator.


Prepare the peanut sauce by adding all the Peanut Sauce ingredients in a 2 quart sauce pan. Mix well and cook on medium heat. Stir the sauce while cooking. Turn off the heat when the sauce is slightly thickened. It takes about 10-15 minutes.


Take out the marinated chicken from the refrigerator. Insert the wooden skewers through the meat lengthwise. Grill the Sate for 4 minutes on each side or until desired tenderness. I grill them on the lowest heat, turning frequently so they don't burn.  

Serve with Peanut Sauce and peeled and sliced cucumbers, and Thai sticky rice.


Green Papaya Salad

We are currently living in an area that doesn't have green papaya. However, someone told me to use cucumber as a substitute. I actually tried it this time, and it worked well. The texture is pretty much the same, yet doesn't retain its firmness as well.


Green Papaya Salad

 Ingredients:  

1 clove Garlic

1 or 2 red Thai Chilies

2 tablespoons dried Shrimp

Thai palm sugar, to taste

1/4 cup roasted Peanuts

2 cups green Papaya strands

6 cherry Tomatoes

Juice of 1 fresh lime- to taste

Soy sauce

Fish sauce, to taste


Method:

Pound the garlic and bird’s eye chilies until they form a smooth paste.

Add the dried shrimp and pound until the pieces are broken up, but not completely pulverized.

Add the palm sugar (cut into small pieces), maybe 2-3 teaspoons at first. Add the peanuts and lightly pound until they are broken into small pieces, but not to the point where they form a thick paste.


Add the papaya and tomatoes and pound on them until the tomatoes begin to burst. Add a few teaspoons of fish sauce and a couple of teaspoons of lime juice to the mix.

Adjust taste by adding additional palm sugar, soy sauce, lime juice and fish sauce. Serve cold immediately.

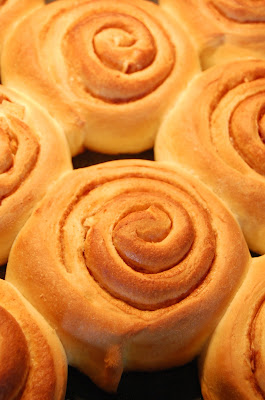
Apple-Cinnamon Rolls


I usually make these on special occasions, or holidays. It works out perfectly to make them to day before, roll them out, then prep them for the second rise on day #2. Enjoy.

Apple-Cinnamon Rolls

Yields: 12-15 Cinnamon Rolls

**Adapted from a whatscookingamerica recipe

Ingredients:

1 cup 2% milk (heated approximately 1 minute in microwave)

1/4 cup warm water (110 degrees F.)

2 teaspoons pure vanilla extract

1/2 cup butter, room temperature

2 eggs, room temperature and beaten

1/2 teaspoon salt

1/2 cup granulated sugar

1 teaspoon Orange extract

5 cups bread flour

1 tablespoon vital wheat gluten flour (optional)*

3 teaspoons instant active dry yeast


Cinnamon Filling (see recipe below)

Cream Cheese-Butter Frosting (see recipe below)

* The Vital Wheat Gluten helps the sweet bread dough rise better, be more elastic, and easier to roll out.

Standup Mixer Recipe:

In a large bowl or in the bowl of a 5-quart stand mixer, combine all the ingredients in the order given except the Cinnamon Filling and the Butter Frosting. Using a dough hook, mix everything together until a soft dough forms.

Check the dough. It should form a nice elastic ball. If you think the dough is too moist, add additional flour (a tablespoon at a time). The same is true if the dough is looking dry and gnarly. Add warm water (a tablespoon at a time). If you can't judge your dough by looking, stick your finger in and feel the dough. It should be slightly tacky to the touch.

Turn the dough out onto a lightly-oiled surface (I use a nonstick cooking spray), and knead until elastic, approximately 10 minutes. Cover the bowl with plastic wrap and let rise until double in size.

Butter a 9 x 13 x 2-inch baking pan; set aside.

After dough has risen, roll and stretch the dough into approximately a 15 x 24-inchrectangle.

Brush the 1/2 cup softened butter (listed below in the Cinnamon Filling) over the top of the dough with a rubber spatula or a pastry brush. Sprinkle Cinnamon Filling over the butter on the prepared dough. Starting with long edge, roll up dough; pinch seams to seal. NOTE: Rolling the log too tightly will result in cinnamon rolls whose centers pop up above the rest of them as they bake

With a knife, lightly mark roll into 1 1/2-inch section. Use a sharp knife (I like to use a serrated knife and saw very gently) or slide a 12-inch piece of dental floss or heavy thread underneath. By bringing the ends of the floss up and criss-crossing them at the top of each mark, you can cut through the roll by pulling the strings in opposite directions. Place cut side up in prepared baking pan, flattening them only slightly. The unbaked cinnamon rolls should not touch each other before rising and baking. Do not pack the unbaked cinnamon rolls together.


TWO OPTIONS:

Refrigerating or Freezing Unbaked Cinnamon Rolls:

At this point, the cinnamon rolls can be covered with plastic wrap and refrigerated overnight (I've actually made them two days in advance) or frozen for 1 month. Before baking, allow rolls to thaw completely and rise in a warm place if frozen. I have found that I have to take the unbaked frozen cinnamon rolls out of the freezer 10 to 12 hours before planning to bake. I just put the frozen cinnamon rolls (container and rolls) on my counter (not in the refrigerator) overnight for 10 to 12 hours.


If refrigerated, they can be either baked upon removing from the refrigerator or let come to a room temperature (I've done both ways). They do a slow rise overnight and it is not necessary to let them come to room temperature before baking. NOTE: If you rolls are not rising enough after being refrigerated, your yeast may need to be tested. To overcome this, let them rise, while sitting on the counter, until you achieve the desired rising before baking.

Bake Immediately After Making:

Cover and let rise in a warm place for approximately 45 to 60 minutes or until doubled in size (after rising, rolls should be touching each other and the sides of the pan).


Preheat oven to 350 degrees F. for regular oven or 325 degrees F. for a convection oven. 


Bake in a convection oven approximately 15 to 20 minutes until they are a light golden brown.


Baked in a regular oven approximately 20 to 25  minutes in a regular oven until they are a light golden brown.


Remove from oven and let cool slightly. Spread Butter Frosting over the cinnamon rolls while still warm. Best served warm, but room temperature is also great! 


Yields 12-15 cinnamon rolls.


Cinnamon-Apple Filling:

1/2 cup butter, melted or softened (1 stick)

1 cup firmly-packed brown sugar

4 to 5 tablespoons ground cinnamon

2 yellow-red variety apples, peeled, cored, and chopped into small pieces


In a bowl, combine brown sugar and cinnamon. Peel & slice apple, set aside. With a spatula, thinly spread butter on top of dough. Gradually sprinkle cinnamon-sugar mixture on top of butter dough until the entire piece of dough is saturated evenly. Sprinkle apple pieces on top of dough.


Cream Cheese-Butter Frosting:

4 ounces Cream cheese, room temperature

¼  cup unsalted Butter, room temperature

2 cups powdered (Confectioners) Sugar

1 teaspoon pure Vanilla extract

1/8 teaspoon Orange extract

¼ cup Whipping cream or Half n Half

In a medium bowl, combine cream cheese and butter until creamy. Add powdered sugar, vanilla extract, and orange extract until completely mixed and creamy. Gradually add the half and half or whipping cream, while still mixing and thin the icing to the desired consistency. Refrigerate frosting until ready to use and then bring to room temperature before spreading.


Cooking Challenges

I have found cooking for the family lately to be quite a challenge. I'm in my third trimester, and conforming to what expectations I have for myself has been the biggest challenge. The family doesn't necessarily expect me to cook every night, but my mind tells me I need to, it's my responsibility, and I need to take care of my family...despite being quite pregnant with twins.

With two other older children in the house, I'm learning to let go, and trust more. This is easier said than done, especially for control freaks like myself. Things always have to be done a certain way, using a specific method, and come out perfectly. I am starting to accept that this is not only an unreal expectation at this stage in pregnancy, but I'm actually beginning to care that I conform to that expectation less and less. This is a good thing. Necessity over desire.

I've started shifting the home responsibilities over to my hubby, like the grocery shopping, laundry, etc. My oldest, almost 13 year old daughter has been by my side cooking over the years, and is quite capable of following a simple recipe (or more), or taking step-by-step commands from me, whilst laying in the comfort of my bed.

This experience is teaching me the I cannot and should not have to do everything on my own, and there are many people around me who are willing to, and do support me. I just have to let them. So now we play the waiting game till the twins arrive....will it be 5 more weeks or 7-8 more weeks...who knows? Until then, I am resting up, not overdoing it, cooking when I can, and looking to the people who love me to help support me at this time. I am very blessed and thankful!

Tuesday, August 7, 2012

Vegetable Chicken Pasta Soup


I usually make this when there are veggies in the house that need to get used. Although this variation is utilizing zucchini, tomatoes, carrots, swiss chard, spinach and celery, you could really use most green vegetables, and any type of shell or small variety pasta. Enjoy!


Vegetable Chicken Pasta Soup


Ingredients:

4 cups chicken stock

1 pound skinless chicken breasts-diced

1 bunch (1 cup) roughly chopped Sweet Basil

1 Yellow Onion-diced

4-5 cloves Garlic-minced

6-7 stalks Celery-thinly sliced lengthwise then chopped


1 cup diced Carrots

2 Zucchini-diced

2 Tomatoes-diced (or you can use whole stewed canned) 12 oz.

2 cups dry pasta (Fusilli or shell)

2 cups fresh Baby Spinach or Swiss Chard

½ Teaspoon dried Red Pepper flakes

2 cubed Chicken Bouillon

½ teaspoon Thyme

1 teaspoon Italian seasoning

1 teaspoon Smoked Paprika

Salt & Pepper or Nature’s seasoning to taste


Directions:

In a large pot, sauté onions, garlic and basil in a few tablespoons of Olive oil over medium-high heat until golden brown. Add chicken, stir and cover. Stir chicken every couple of minutes, cooking for about 10 minutes. Add dry spices, tomatoes, chicken stock, and cover.


Wash, dry & dice your vegetables. Remove middle section of red stems from swiss chard, before rough chopping & adding to soup. Add to pot, stir and cover. Cook for 15 minutes. Ensure that you have enough broth to cover dry pasta noodles, add pasta, season broth, & cook for an additional 7-8 minutes, or until your pasta is tender. Serve.


Thursday, August 2, 2012

Loaded Roasted Garlic Mashed Potatoes


Loaded Roasted Garlic Mashed Potatoes

Ingredients:

2 lbs. Red Potatoes-washed and diced

1 whole bulb Garlic-unpeeled

1 cup whole Cream

1 bunch Green Onions (Scallions)

1 cup white-yellow Cheese blend

1 stick of unsalted Butter

Salt and pepper to taste


Directions:

Wash and dice potatoes into large chunks. In a large pot, add salt & water- then place potatoes into pot and cover. Boil on medium high heat until potatoes are tender. Drain.

In a small baking sheet, cut off the edges of the top of the bulb of garlic, sprinkle with salt and pepper, and drizzle with olive oil. Place into the oven at 350 degrees. Bake until golden brown, and garlic is roasted and tender. With a fork, gently remove garlic from casings.
Add potatoes, garlic, chopped scallions, butter, and salt and pepper to large mixer. Mix until creamy and no lumps are remaining. Slowly add cream, adjusting for consistency. Add grated cheese, and mix well. Adjust salt and pepper if needed, and serve while potatoes are hot.

Cauliflower Mac N Cheese


This mac n cheese is made with a basic milk, flour and cheese bechamel. It delivers a creamier and more consistent texture, and allows your cauliflower to mesh into the pasta better. Enjoy!

Cauliflower Mac & Cheese

Ingredients

  • 3 cups blanched diced Cauliflower (1 head)
  • 3 Garlic cloves, minced
  • 1 Yellow Onion-diced
  • ½ cup Panko (Japanese breadcrumbs)
  • 3 tablespoons unsalted Butter, room temperature, divided
  • 5 tablespoons All-purpose Flour
  • 2 cups whole Milk
  • Salt & pepper
  • ½ teaspoon Paprika
  • ¼ cup Parmesan
  • 1 cup Grated Asiago cheese
  • 1 & ½ cups grated white/yellow cheese blend
  • 1 cup (packed) coarsely grated whole-milk mozzarella
  • 8 ounces spiral Pasta

Béchamel:

  • Mince garlic, and yellow onion, sautéing over medium heat with butter. Add flour, making a roux. Add milk, & mix consistently, until all lumps are gone, and roux is silky and smooth. Continue to cook over medium heat until sauce starts to thicken. Turn off heat & add Asiago, Mozzarella, & ½ cup cheese blend. Season to taste with salt, paprika and pepper.
Directions:

  • Heat a large pot of water, and a pinch of salt until it reaches a rolling boil. Wash and chop cauliflower into bite-sized pieces. Blanch for 2-3 minutes, then immediately remove, and place into cold water and a strainer. Drain and set aside.  

  • Cook pasta according to directions on box, drain, rinse & set aside.
  • Toast panko in skillet over medium-high heat until golden, stirring often, 5 to 6 minutes. Transfer to bowl; cool to lukewarm. Rub 1 tablespoon butter into crumbs to coat. Mix in 1/4 cup Parmesan.
  • Preheat oven to 400°F. Butter large baking dish, then spoon pasta into dish. Stir sauce, remaining cheese & cauliflower into pasta. Sprinkle with crumb topping, and more grated cheese.
  • Bake pasta until topping is crisp and sauce is bubbling, about 25 minutes. Serve.

Friday, July 6, 2012

Red Velvet Raspberry Cheesecake


Red Velvet Raspberry Cheesecake

**Recipe adapted from a Brown Eyed Baker Recipe


Yield: 12 servings

Prep Time: 1 hour (active) + 8 hours (inactive) | Bake Time: 1 hour 20 minutes


For the Cheesecake:

 32 ounces low or reduced fat cream cheese, at room temperature

 1¼ cups granulated sugar

 4 eggs, at room temperature

 ½ cup heavy cream

 2 tablespoons vanilla extract


For the Red Velvet Cake:

 1 cup unsalted butter, at room temperature

 1½ cups granulated sugar

 2 eggs

 ¼ cup + 3 tablespoons unsweetened cocoa powder

 6 tablespoons red food coloring (liquid)

 1 teaspoon vanilla extract

 1 cup buttermilk

 2¼ cups all-purpose flour

 1 teaspoon baking soda

 1 teaspoon salt

 1 tablespoon distilled white vinegar


For the Raspberry Sauce/Filling:

 1 cup sugar

 ½ cup water

 3 tablespoons corn starch-dissolved in 1/8 cup water

 5 cups washed fresh raspberries

For the Cream Cheese Frosting:

 1 cup butter, at room temperature

 8 ounces cream cheese, at room temperature

 5 cups powdered sugar

 2 tablespoons clear vanilla extract


Directions:

1. Make the Cheesecake: Preheat oven to 350 degrees F. Butter a 9-inch springform pan and then tightly wrap the outside with heavy duty foil, to prevent leaks. Boil the water for your water bath & add to a large pan big enough to fit your springform pan.


2. Using an electric mixer, beat together the cream cheese and sugar at medium speed until completely smooth, about 3 minutes. Add the eggs one at a time, beating for a minute or so after each addition, and scraping down the sides of the bowl as needed. Add the heavy cream and vanilla extract, and beat until completely incorporated.


3. Pour the batter into the springform pan; place the springform pan into a larger pan, such as a roasting pan, and pour the boiling water into the larger pan until the water comes about halfway up the side of the springform pan.


4. Bake until the cheesecake edges are set but the middle still jiggles a bit, about 55-60 minutes. Turn the oven off, but leave the cheesecake in the oven with the door closed for 1 hour. After one hour, remove the cheesecake from the water bath and place the springform pan on a cooling rack to cool to room temperature. Place the cheesecake in the refrigerator until well-chilled, at least 4 hours or overnight.


5. Make the Red Velvet Cake: Preheat oven to 350 degrees F. Grease two 9-inch cake pans. Line the bottoms of the pans with a parchment round, butter the parchment paper, and then flour the pans.


6. On medium-high speed, cream the butter and sugar until light and fluffy, about 3 minutes. Turn the mixer to high and add the eggs one at a time, mixing for about a minute after each addition. Scrape down the bowl and beat until well incorporated.


7. In a separate small bowl, mix together the cocoa powder, vanilla extract and red food coloring to make a thick paste. Add to the batter and mix on medium speed until completely combined. You may need to stop the mixer to scrape the bottom of the bowl, making sure that all the batter gets color.


8. Reduce the mixer speed to low and slowly add half of the buttermilk. Add half of the flour and mix until combined. Scrape the bowl and repeat the process with the remaining buttermilk and flour. Beat on high until smooth.


9. Again, reduce the mixer speed to low and add the salt, baking soda and vinegar. Turn to high and beat for another couple of minutes until completely combined and smooth.


10. Divide the batter evenly between the two cake pans and bake for about 30 minutes, or until a thin knife or skewer inserted into the center comes out clean. Cool for 10 minutes and then remove cakes from the pans and place them on a cooling rack to cool completely.


11. On the stove top add water, sugar and raspberries to a small pot. Bring to a boil over medium high heat, and reduce. Dissolve corn starch in water, & add to pot. Whisking well, combine & stir until thickened. Remove from heat & set aside to cool for use later.


12. Make the Frosting: Using an electric mixer with the whisk attachment, whip the butter and cream cheese on high speed for about 5 minutes, scraping down the bowl as necessary. Reduce the speed to low and slowly add the powdered sugar until all is incorporated. Add the vanilla and mix to combine. Increase the speed to medium-high and whip for a few minutes until the frosting is light and fluffy, scraping the bowl as necessary.


13. Assemble the Cheesecake: If needed, level the tops of the red velvet cake layers with a serrated knife or cake leveler so that the tops are level and not domed. Next, slice the cheesecake in half horizontally to create two layers. Place one layer of the red velvet cake on your serving plate. Spread a very thin layer of the cream cheese frosting over it (it creates a type of glue so that the layers stick together and don’t slide around). Then on top of each layer of frosting, add a few spoonful’s of raspberry filling. Save the remaining filling for the top of your cake. Top that with one layer of the cheesecake, and again top with a very thin layer of frosting. Repeat, adding the second red velvet layer, and then placing the second cheesecake layer on top, with a layer of frosting between them. Using the remaining frosting, cover the cake in frosting and decorate as desired. Decorate with remaining raspberry filling, or save for use to top each individual slice of cake when you serve. Refrigerate until ready to serve.


Wild Rice Asian Salad


Wild Rice Asian Salad


Ingredients:

¼ cup extra virgin Organic Olive Oil

1 tablespoon Butter

Toasted Sesame seeds

2 tablespoons Sesame oil-for dressing

4 green onions-chopped

1 tablespoon White Pepper

3-4 cloves Garlic-minced

1 whole Yellow Onion-minced

1 cup freshly chopped Thai Basil

1 cup uncooked Wild Rice pilaf (use quick cook-or soak for 1 hour beforehand)

2 cups Long-Grain Jasmine Rice

2-3 tablespoons low-sodium Soy Sauce

1 teaspoon Fish Sauce

1/2 finely chopped green Chili (optional)

1 cup chopped water Chestnuts (canned)

3 cups sliced sautéed Baby Portabella Mushrooms

1 tablespoon grated fresh Ginger

1 green Bell Pepper-diced

½ red Bell Pepper-diced

3 stalks Celery-chipped finely

Juice of 1 Lemon

Salt to taste

4 cups chicken or vegetable stock

 Optional** Toasted Almond Slivers

Directions:

Over stovetop over medium-high heat, in a large skillet with a lid, heat olive oil, then add garlic & onions. Sautee until fragrant & golden brown. Add mushrooms, chili, and 1 tablespoon of butter. Sauté until they have a golden brown color. Add uncooked rice, and stock, mix well. Reduce heat to lowest setting, and cover. Cook until all liquid is gone, and when rice is tender.


Remove rice from heat and add to a large bowl. Add any seasonings, and spices, sesame oil, vegetables, ginger, lemon juice and adjust to taste. Toss well. Serve immediately.

Thursday, July 5, 2012

Lower-Fat New York Style Cheesecake with Raspberry Sauce


Lower-Fat New York Style Cheesecake with Raspberry sauce

Yield: 12 servings
Bake Time: 55 minutes + 12 minutes
For the Cheesecake:
 32 ounces low or reduced fat cream cheese, at room temperature
 1¼ cups granulated sugar
 4 eggs, at room temperature
 ½ cup heavy cream
 2 tablespoons vanilla extract

For the Crust:
 ¼ cup sugar
 1 package graham crackers or similar type of cookie (I used Digestive Cookies)
 ½ tsp. Nutmeg
½ tsp. ground Ginger
¼ cup melted butter
For the Raspberry Sauce/Filling:
 1 cup sugar
 ½ cup water
 3 tablespoons corn starch-dissolved in 1/8 cup water
 5 cups washed fresh raspberries

Directions:
1. Make the Crust and Cheesecake: Preheat oven to 350 degrees F. Butter a 9-inch springform pan and then tightly wrap the outside with heavy duty foil, to prevent leaks. In a medium sized bowl, melt the butter, then add sugar and spices. In a bag, or food processor- crumble cookies or graham crackers until they resemble fine crumbs. Add to butter. Mix well, & press into your springform pan. Bage at 350 for about 10-12 minutes. Remove from heat & cool on a wire rack.
Boil the water for your water bath & add to a large pan big enough to fit your springform pan.

2. Using an electric mixer, beat together the cream cheese and sugar at medium speed until completely smooth, about 3 minutes. Add the eggs one at a time, beating for a minute or so after each addition, and scraping down the sides of the bowl as needed. Add the heavy cream and vanilla extract, and beat until completely incorporated.

3. Pour the batter into the springform pan; place the springform pan into a larger pan, such as a roasting pan, and pour the boiling water into the larger pan until the water comes about halfway up the side of the springform pan.

4. Bake until the cheesecake edges are set but the middle still jiggles a bit, about 55-60 minutes. Turn the oven off, but leave the cheesecake in the oven with the door closed for 1 hour. After one hour, remove the cheesecake from the water bath and place the springform pan on a cooling rack to cool to room temperature. Place the cheesecake in the refrigerator until well-chilled, at least 4 hours or overnight.

5. On the stove top add water, sugar and raspberries to a small pot. Bring to a boil over medium high heat, and reduce. Dissolve corn starch in water, & add to pot. Whisking well, combine & stir until thickened. Remove from heat & set aside to cool for use later.

Decorate with cooled raspberry filling, and save remaining filling to top each individual slice of cheesecake when you serve. Refrigerate until ready to serve.

Monday, July 2, 2012

We're Expecting.......Twins!

As some of you have noticed, I've been completely absent from my blog since March. Fear not-I am not dead, but am elated to announce that we are expecting TWINS in the Fall. I am so excited to share this amazing news with all of my readers, and I hope you can share in this happy event. Those who know us personally know that it has been a long road, and to have this blessing is beyond words.

Needless to say for any of you Mom's that have been pregnant, even a single pregnancy can pose it's challenges, not to mention two little babies. I am now feeling much better, getting bigger, & tackling the challenges of getting ready for our two new additions, & everything that comes with it.

Our household has had many changes so far this year. We have been blessed with a new home, two babies on the way & great sucessess in our personal and professional lives. Our two older kids are out of school, we just got back from our awesome Seattle-Vancouver vacation, and are now preparing for an upcoming visit from our in-laws, and baby shower this coming weekend. Whew!!!

With all this going on--I most certainly need my naps. I have not stopped cooking, but blogging, photo taking and still working and running a household can be exhausting. I am planning on easing back into it, & am of course still cooking for the fam. They are not starving yet.

Saturday, February 25, 2012

Goat Cheese, Date, & Pear Balsamic Field Green Salad

This salad is simply divine! Not only does it go well with a glass of wine & a buttered slice of fresh french bread, BUT you can also put it on top your freshly baked homemade cheese pizza! enjoy!

Goat Cheese, Date, & Pear Balsamic Field Green Salad
Ingredients:

1 Bag (1lb. Field Greens washed and drained)

2 ripe red Pears, seeded, diced, and set aside (toss in lemon juice)

Juice of ½ a lemon (for pears)

½ cup diced Dates (pits removed)

½ cup Goat cheese

½ cup Caramelized Walnuts

¼ cup high quality extra virgin olive oil

½ cup high quality sweet balsamic vinegar (I only use the 18 year aged balsamic from http://robbinsfamilyfarm.com/store.html)

Salt and pepper

Nature’s Seasoning to taste

Directions:

Preheat oven to 350 degrees. Rough chop walnuts & add to 1 teaspoon of butter and 1 teaspoon of brown sugar. Bake until golden brown, toss & set aside to cool.


In a large salad bowl, whisk together olive oil, Balsamic vinegar, salt and pepper, and dates.  Allow dates to sit in dressing for about 15 minutes.


Combine greens, and drizzle dressing on top, toss, and then add pears & and walnuts. Toss, & sprinkle each serving with goat cheese. Serve immediately.

Friday, February 24, 2012

Fried Green Tomatoes

Ever stop & wonder what those green tomatoes at the grocery store are used for? Well, now you know. I watched the movie "Fried Green Tomatoes" years ago, but never tried these until I was with my hubby in Montgomery Alabama, heart of the South. Boy-did these knock our socks off.

We loved them so much we set out to replicate them. It was so much easier than we thought. These are highly addicting, and almost a meal in themselves. Enjoy.


Fried Green Tomatoes

Ingredients:
3-4 medium, firm Green tomatoes
Natures Seasoning (or salt & pepper) to taste
1 cup all-purpose flour
1/2 cup Buttermilk
2 Eggs-beaten
A pinch of Salt
1/3 cup Breadcrumbs
3/4 cup yellow Cornmeal
1/8 teaspoon Cayenne/Paprika mix
1/2 cup Vegetable oil


Directions:
Cut unpeeled tomatoes into 1/2 inch slices. Sprinkle slices with salt. Let tomato slices stand for 5 minutes.

Place in separate bowls: Flour, Natures seasoning, and paprika/cayenne.
In Another bowl: Buttermilk, egg, & a pinch of salt. 
In the last bowl: Cornmeal, a pinch of salt, & breadcrumbs.

Heat the vegetable oil in a skillet on medium heat. Beat the egg and the buttermilk together. Dip tomato slices in the flour-seasoning mix, then buttermilk-egg mixture, then the cornmeal-bread crumb mix. In the skillet, fry half of the coated tomato slices at a time, for 3-5 minutes on each side or until brown. Set the cooked tomatoes on paper towels to cool & drain oil. Serve immediately, with a spicy mustard or remoulade sauce.