Showing posts with label cake. Show all posts

Sunday, March 31, 2013

Carrot-Coconut & Pineapple Spice Cake with Cream Cheese Icing

This is BIG! Real big. Imagine the perfect carrot cake...spicy, nutty, & a hint of fruit. Only now...get ready.....pineapple & coconut too! Wow. And you thought it couldn't get ANY better. Ha! I made this for Easter last year. Warning: You cannot eat just 1 piece! For reals!

Carrot cake is delicious in it of itself, but once you add the pineapple & toasted coconut, you just can't go wrong. Enjoy this variation & let me know how you LOVE it. It serves around 16 good sized portions.


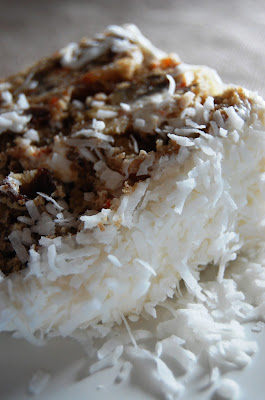
Carrot-Coconut, Date & Pineapple Spice Cake with Cream Cheese Icing

Cake:

1 cup chopped pecans or walnuts

3/4 pound raw carrots (about 2 1/2 cups finely grated)

½ cup crushed canned pineapple tidbits

1 cup chopped Dates

1 cup toasted Coconut flakes + 1 1/2 cups for outside of cake (optional)

1 cup yellow golden raisins

2 cups (260 grams) all-purpose flour

1 teaspoon baking soda

1 1/2 teaspoons baking powder

1/2 teaspoon salt

1 1/2 teaspoons ground cinnamon

2 teaspoons ground Ginger

1 teaspoon Nutmeg

4 large eggs

1 1/2 cups (300 grams) granulated white sugar

1 cup canola oil (or corn oil)

2 teaspoons pure vanilla extract


Cream Cheese Frosting:

1/4 cup unsalted butter, room temperature

8 ounces cream cheese, room temperature

4 cups confectioners (powdered or icing) sugar, sifted

1 teaspoon clear vanilla extract

1 teaspoon finely grated lemon zest


Directions:

Preheat oven to 350 degrees F (180 degrees C) and place rack in center of oven. Butter or spray three - 9 x 2 inch (23 x 5 cm) cake pans and line the bottoms of the pans with a circle of parchment paper. 

Toast the pecans or walnuts for about 8 minutes or until lightly browned and fragrant. Let cool and then chop coarsely. Peel and finely grate the carrots.

In a separate bowl whisk together the flour, baking soda, baking powder, salt, and nutmeg, ginger and ground cinnamon.

In bowl of electric mixer (or with a hand mixer), beat the eggs until frothy (about 1 minute). Gradually add the sugar and beat until the batter is thick and light colored (about 3 - 4 minutes).

Add the oil in a steady stream and then beat in the vanilla extract. Add the flour mixture and beat just until incorporated. With a large rubber spatula fold in the grated carrots, dates, pineapple and chopped nuts.

Evenly divide the batter between the three prepared pans and bake 25 to 30 minutes or until a toothpick inserted in the center comes out clean. 

Remove from oven and let cool on a wire rack. After about 5 -10 minutes invert the cakes onto the wire rack, remove the pans and parchment paper, and then cool completely before frosting. 


Cream Cheese Frosting:

In bowl of electric mixer (or with a hand mixer), beat the cream cheese and butter, on low speed, just until blended with no lumps. Gradually add the sifted powdered sugar and beat, on low speed, until fully incorporated and smooth. Beat in the vanilla extract, and lemon zest.
 
To Assemble:
Place one cake layer onto your serving plate. Arange small peices of parchment paper underneath corners of your cake, so that the icing doesn't get into your cake plate. You can pull these out as soon as you are finished icing the cake. Just don't place them too far underneath your cake, or the weight will cause the cake to break when you remove them.


Spread with a few tablespoons of frosting, then add the next and subsequent layers, repeating the same step. Once all three layers are iced in the middle "dirty" ice the outside of your cake. this layer helps to secure the cake, and mould the exterior, then ice it with the remaining icing a final time. chill until ready to serve. I also used the remaining untoasted coconut to gently place of the outside of my cake. about half the frosting.


Friday, July 6, 2012

Red Velvet Raspberry Cheesecake


Red Velvet Raspberry Cheesecake

**Recipe adapted from a Brown Eyed Baker Recipe


Yield: 12 servings

Prep Time: 1 hour (active) + 8 hours (inactive) | Bake Time: 1 hour 20 minutes


For the Cheesecake:

 32 ounces low or reduced fat cream cheese, at room temperature

 1¼ cups granulated sugar

 4 eggs, at room temperature

 ½ cup heavy cream

 2 tablespoons vanilla extract


For the Red Velvet Cake:

 1 cup unsalted butter, at room temperature

 1½ cups granulated sugar

 2 eggs

 ¼ cup + 3 tablespoons unsweetened cocoa powder

 6 tablespoons red food coloring (liquid)

 1 teaspoon vanilla extract

 1 cup buttermilk

 2¼ cups all-purpose flour

 1 teaspoon baking soda

 1 teaspoon salt

 1 tablespoon distilled white vinegar


For the Raspberry Sauce/Filling:

 1 cup sugar

 ½ cup water

 3 tablespoons corn starch-dissolved in 1/8 cup water

 5 cups washed fresh raspberries

For the Cream Cheese Frosting:

 1 cup butter, at room temperature

 8 ounces cream cheese, at room temperature

 5 cups powdered sugar

 2 tablespoons clear vanilla extract


Directions:

1. Make the Cheesecake: Preheat oven to 350 degrees F. Butter a 9-inch springform pan and then tightly wrap the outside with heavy duty foil, to prevent leaks. Boil the water for your water bath & add to a large pan big enough to fit your springform pan.


2. Using an electric mixer, beat together the cream cheese and sugar at medium speed until completely smooth, about 3 minutes. Add the eggs one at a time, beating for a minute or so after each addition, and scraping down the sides of the bowl as needed. Add the heavy cream and vanilla extract, and beat until completely incorporated.


3. Pour the batter into the springform pan; place the springform pan into a larger pan, such as a roasting pan, and pour the boiling water into the larger pan until the water comes about halfway up the side of the springform pan.


4. Bake until the cheesecake edges are set but the middle still jiggles a bit, about 55-60 minutes. Turn the oven off, but leave the cheesecake in the oven with the door closed for 1 hour. After one hour, remove the cheesecake from the water bath and place the springform pan on a cooling rack to cool to room temperature. Place the cheesecake in the refrigerator until well-chilled, at least 4 hours or overnight.


5. Make the Red Velvet Cake: Preheat oven to 350 degrees F. Grease two 9-inch cake pans. Line the bottoms of the pans with a parchment round, butter the parchment paper, and then flour the pans.


6. On medium-high speed, cream the butter and sugar until light and fluffy, about 3 minutes. Turn the mixer to high and add the eggs one at a time, mixing for about a minute after each addition. Scrape down the bowl and beat until well incorporated.


7. In a separate small bowl, mix together the cocoa powder, vanilla extract and red food coloring to make a thick paste. Add to the batter and mix on medium speed until completely combined. You may need to stop the mixer to scrape the bottom of the bowl, making sure that all the batter gets color.


8. Reduce the mixer speed to low and slowly add half of the buttermilk. Add half of the flour and mix until combined. Scrape the bowl and repeat the process with the remaining buttermilk and flour. Beat on high until smooth.


9. Again, reduce the mixer speed to low and add the salt, baking soda and vinegar. Turn to high and beat for another couple of minutes until completely combined and smooth.


10. Divide the batter evenly between the two cake pans and bake for about 30 minutes, or until a thin knife or skewer inserted into the center comes out clean. Cool for 10 minutes and then remove cakes from the pans and place them on a cooling rack to cool completely.


11. On the stove top add water, sugar and raspberries to a small pot. Bring to a boil over medium high heat, and reduce. Dissolve corn starch in water, & add to pot. Whisking well, combine & stir until thickened. Remove from heat & set aside to cool for use later.


12. Make the Frosting: Using an electric mixer with the whisk attachment, whip the butter and cream cheese on high speed for about 5 minutes, scraping down the bowl as necessary. Reduce the speed to low and slowly add the powdered sugar until all is incorporated. Add the vanilla and mix to combine. Increase the speed to medium-high and whip for a few minutes until the frosting is light and fluffy, scraping the bowl as necessary.


13. Assemble the Cheesecake: If needed, level the tops of the red velvet cake layers with a serrated knife or cake leveler so that the tops are level and not domed. Next, slice the cheesecake in half horizontally to create two layers. Place one layer of the red velvet cake on your serving plate. Spread a very thin layer of the cream cheese frosting over it (it creates a type of glue so that the layers stick together and don’t slide around). Then on top of each layer of frosting, add a few spoonful’s of raspberry filling. Save the remaining filling for the top of your cake. Top that with one layer of the cheesecake, and again top with a very thin layer of frosting. Repeat, adding the second red velvet layer, and then placing the second cheesecake layer on top, with a layer of frosting between them. Using the remaining frosting, cover the cake in frosting and decorate as desired. Decorate with remaining raspberry filling, or save for use to top each individual slice of cake when you serve. Refrigerate until ready to serve.


Sunday, November 6, 2011

14 Layer Cake with Chocolate Ganache & Hand Piped Candy Designs-Part 1


14-Layer Cake with Chocolate Ganache and hand piped Candy Designs-Part 1


You will need: 14 aluminum 8x5 disposable pans, parchment paper, & cake cardboard round, and a rack (to place cake on while icing).

Cake Ingredients:

4 1/2 cups all-purpose flour, sifted

1 1/2 teaspoons baking powder

1/4 teaspoon salt

1 1/2 cups (3 sticks) unsalted butter, at room temperature

2 1/2 cups sugar

6 large eggs, at room temperature

3 cups milk

1 1/2 teaspoons vanilla extract


Ganache Filling:

2/3 cup unsweetened Dutch process cocoa powder

1 cup (2 sticks) unsalted butter, cut up

1 can (12 ounces) evaporated milk

1 tablespoon Vanilla extract

2 1/2 cups granulated sugar

¼ cup dark Rum-for brushing onto layers


Directions for Ganache:

To make the ganache, bring the sugar, cocoa, butter and evaporated milk to a full boil in a large saucepan. Reduce the heat to medium-low and cook until the icing has thickened slightly (it will resemble chocolate syrup but will thicken as it cools), about 3 minutes. Stir in the vanilla. Let the icing cool until thick enough to spread, but still pourable. Before icing each layer with ganache, brush lightly with dark rum, then cover with ganache, taking care to cover the edges of the cake. Once the entire cake is covered in ganache, chill & set in fridge for 30 minutes, while you make your spreadable icing.


Chocolate Ganache Spreadable Frosting:
1 large 24 oz. semi-sweet Hershey’s chocolate chips

1 cup heavy cream

1 tablespoon vanilla or dark rum


Directions for Ganache Spreadable Icing:

In a medium saucepan, heat cream to 110 degrees. Pour over chocolate chips in a glass bowl, mixing slowly. Do not whisk or beat. This can cause the fat to separate from the chocolate. Once completely melted and combined, add the vanilla or rum. Spread over cake with an icing knife once it cools to the desired consistency.   


Cake Directions:

Position racks in the center and bottom third of the oven and preheat to 375°. Lightly butter four 8 1/2- to 9-inch cake pans (you will bake the cakes in three batches) and line the bottoms with rounds of parchment paper. Flour the pans and tap out the excess.
To make the layers, sift together the sifted flour, baking powder and salt. Sift the mixture one more time, and set aside.

Beat the butter and sugar in the bowl of a heavy-duty electric mixer fitted with the paddle blade on high speed until light in color and texture, about 3 minutes. Beat in the eggs, one at a time. Scrape down the bowl and be sure the mixture is well-blended. On low speed, add the flour in 3 additions, alternating with 2 additions of the milk, beginning and ending with the flour, and beat until smooth, scraping down the sides of the bowl often with a rubber spatula. Beat in the vanilla. Using a scant cup for each layer, spread the batter evenly in the pans. It will make a thin layer.

Staggering the pans on the racks so they are at least 2 inches from each other and the sides of the oven and not directly over each other, bake the layers until they feel firm when pressed in the centers and are beginning to pull away from the sides of the pans, about 12 minutes. Cool in the pans for 5 minutes. Invert the layers onto cake racks, remove the parchment paper, and cool completely. Wash and prepare the pans. Repeat the procedure until all 12 layers have been baked and cooled.

Place a layer of cake on a wire rack set over a jelly-roll pan. Spread with a few tablespoons of the icing, letting the excess run down the sides. Stack the remaining cakes, icing each layer. Pour the remaining icing over the top of the cake. If you wish, smooth the icing on the edges to cover the sides. Let stand until the glaze sets. (The cake is best served the day it is made. To store, cover loosely with plastic wrap and refrigerate for up to 1 day.)

Then, I cut 14 sheets of parchment paper, stapled them together and cut out circles the same size as the bottom of the pan. I decided to err on the side of caution with greasing the pans, because fourteen stuck cakes would make me very unhappy. So, I greased the bottom and sides with a stick of butter. Then, I laid the parchment circles down and lightly buttered and floured the top of the parchment paper. While those are waiting, I mixed up all the ingredients for the cake batter - the HUGE amount of cake batter. Then I placed a heaping 2/3 cup full of batter in each pan.

Then, just spread it out as evenly as possible. I was able to bake three cakes at a time. Each set baked for 12 minutes at 350 degrees, (the recipe says 375, but I went with 350). So that means there were five sets at 12 minutes each. (About an hour to bake. Not too bad.) When the last batch of cakes go in the oven, it’s a good time to start making the icing. Then, after the icing cools and before it hardens, you can start spreading a little bit on the top of each layer of cooled cake. Before you start… place the cake on a cake board. Place the board on a wire rack. And place the wire rack over a jelly roll pan to catch any icing that drips. When you’re done with the last layer, pour any extra icing over the top and spread it around the sides to cover. Then ice with the second ganache recipe, using a spreadable icing knife. Decorate as desired, or see my recipe to follow for hand-piped candy designs.

-My cake at auction!

Inspired by http://www.oprah.com/food/The-Smith-Familys-12-Layer-Cake  & some directional information by Bakerella.