Thursday, January 26, 2012

Chocolate-Butterfinger Cupcakes

These cupcakes are the perfect balance between a cupcake, dessert & candy. Could it get any better? I don't feel as bad eating a cupcake as I do eating a couple of pieces of candy...nah, not so bad is it?

The candy melts into the cupcakes, and with the chocolate & butter flavor, you just can't go wrong!


Chocolate-Butterfinger Cupcakes


For the cupcakes:

2 & 1/4 cups All-purpose flour

1/2 cup high quality Cocoa powder

2 teaspoons baking Soda

2 teaspoons baking Powder

1 teaspoon kosher Salt

1 cup Buttermilk, shaken

2 sticks Butter-softened to room temperature

1 & ½ cups granulated Sugar

2 tablespoons Butter flavoring

2 large Eggs, at room temperature

2 teaspoons pure Vanilla extract

1 cup chopped Butterfinger candy (plus more for decoration)

For the Frosting:

2 sticks butter, softened to room temperature

8 ounces softened cream cheese

1 pounds confectioners’ sugar, sifted

1 teaspoon pure Vanilla extract

1 tablespoon whole cream-adjust upward to obtain the desired consistency


Directions: For the cupcakes

Preheat the oven to 350 degrees F. Line standard muffin tins with paper liners; set aside.


Sift the flour, cocoa, baking soda, baking powder, and salt into a medium sized bowl, and then set aside. In the bowl of an electric mixer fitted with a paddle attachment, combine the sugar and butter. Once well combined, add vanilla. Slowly add the buttermilk, eggs, and butter extract, mixing on low speed until combined.


With the mixer on low speed, slowly add the wet ingredients to the dry. With mixer still on low, fold in the butterfingers, and stir just to combine, scraping the bottom of the bowl with a rubber spatula.


3. Using a large scoop, distribute the batter between 24 muffin wells, filling each well 2/3 full. Bake for 18 to 22 minutes, or until a cake tester comes out clean. Cool in the pans for 10 minutes, then remove to a cooling rack and cool completely.


4. Finish by frosting with vanilla frosting.

For the Icing

In a large mixer, combine the sticks of butter, vanilla, cream cheese, and confectioners sugar gradually. Slowly add cream until you reach the desired consistency.


Wednesday, January 25, 2012

Eggplant & Chicken Sausage Spaghetti

This is the quintessential comfort food. A cold night...this is it. This will fill your belly & leave you satisfied!


Eggplant & Chicken Sausage Spaghetti


Ingredients:

1 pound Spaghetti (cooked & retain 1 cup water)

2 ½ cups Marinara sauce (see my recipe here)

1 large purple Eggplant-washed & sliced into bite sized cubes

1 cup shredded Parmesan cheese

2-3 springs of fresh Oregano

2 fresh Bay leaves

¼ cup fresh Basil-chopped

4-5 cloves fresh Garlic-minced

1 yellow Onion-diced

4 tablespoons Olive oil

1 package Chicken Sausage-sliced

Sea Salt

¼ teaspoon crushed Red Pepper flakes

Pepper


Directions:

Boil water for pasta in a large pot. Add salt & a little olive oil. Bring to a boil, add pasta & cook until it is al dente. Retain 1 cup of the pasta water. Begin by sautéing onions, garlic, herbs & olive oil on high heat until golden brown. Add chicken sausage. Cook  for about 2-3 minutes.


Add eggplant, about 1 teaspoon of salt, pepper, & cover. Cook for about 2 minutes, reducing heat to a simmer. Add marinara sauce, water & stir. Cook on low heat for about 10 minutes or until eggplant is cooked. Drain pasta, then immediately add eggplant & cheese, and mix well. Serve immediately.


Lemon-Orange Marmalade

I had left-over lemons & oranges from my Bountiful baskets last weekend, & I wanted to use them up before I left on my trip. This was the perfect way to use up my fruit, & not have to eat it all up right away! Delish! For reals!!!


Lemon-Orange Marmalade


Ingredients:

12 cups Oranges (I used a few tangerines as well)

1 cup of Orange rind

2 lemons, rind & fruit

4 cups granulated Sugar

4 cups Orange juice

(Pectin-follow the directions on your brand of pectin)


Directions:

Begin by washing your fruit. Remove the rinds (with a zesting tool) of 2 lemons & about 3 oranges in long slender slices, resembling a piece of ribbon. Set aside. Begin peeling the skin & as much rind as you can remove from the oranges & lemons. Remove any seeds. Quarter your oranges, & with a paring knife, start trimming the white rind & center pieces that hold the sections of fruit together off of the oranges and lemons. Once you are finished with this step, cut each orange and lemon piece into a thin slice.


Place sugar, oranges, lemons, and orange juice in a large pot with a lid. Boil on medium high heat for about 30 minutes, or until most of the fruit is broken down. Add pectin as directions state. Your fruit should resemble a thick jam like consistency, but will harden up completely once the marmalade sets.


If you are canning the marmalade, ensure that you have boiled (disinfected and sterilized) your jars, lids & rings. Otherwise, use clean plastic or glass storage contains & refrigerate.  Serve chilled, over toast or biscuits.


Friday, January 20, 2012

Rustic Roman Gnocchi with Rosemary Potatoes

This recipe is made in three stages, each in the Dutch oven, and then you mix everything together at the end & serve. This way the juices don't soften the texture of the Gnocchi, and the flavors merge at the end. The potatoes will get a better caramelizing texture is you cook them separately.

Roman style Gnocchi is pan friend, versus the traditional Gnocchi which is cooked by blanching in hot water, similar to how you would cook other pastas.

It’s delicious, & the Gnocchi dough can be made weeks ahead of time (see my recipe here Pumpkin-Potato Gnocchi) & freeze/defrost for later use. The recipe shows the steps to prepare the pumpkin gnocchi, & the sauce I made with it.


Rustic Roman Gnocchi with Rosemary Potatoes


Ingredients:

1 pint fresh Mushrooms-sliced thinly

2 cloves whole fresh Garlic-(unpeeled-but slightly smashed)

¼ teaspoon green Peppercorns

3 cups Fingerling or other small Potatoes (cut into half)

4-5 sprigs fresh Rosemary

2 ½ cups uncooked Gnocchi

6 tablespoons Butter-(divided into 3 batches)

4 teaspoons Olive oil-(divided in half)

Sea Salt

Step 1:

In a Dutch oven, heat to medium high, melt 2 tablespoons butter, 2 teaspoons olive oil, garlic & 2 sprigs of Rosemary. Add potatoes, sprinkle with a pinch of sea salt & black pepper, & cover. Cook for about 2-3 minutes at a time, tossing potatoes so that they cook evenly. Once thoroughly cooked, appearing firm, yet soft when pierced with a fork, remove from heat & allow to cool for 10 minutes covered. Remove from pan & place in a large serving dish, covered in plastic wrap to retain heat.


Step 2:

In the same Dutch oven, heat 2 tablespoons of butter, & sauté mushrooms with a pinch of sea salt & pepper until tender. Remove & add to potatoes. Cover.

Step 3:

In the Dutch oven, heat 2 tablespoons of butter, 2 more sprigs of rosemary, & 2 teaspoons of Olive oil on medium heat. Add gnocchi in two batches. Sprinkle with a pinch of sea salt. Cook evenly without gnocchi touching one another, in one layer. Turn them over half way to cook the underside.

The appearance should be a golden brown, forming a thin crust on the outside, but still soft & fluffy on the inside. I cooked my gnocchi in two batches. Otherwise, only about half of the recipe will cover the pan at one time. Remove from heat, toss with mushrooms & potatoes, and sprinkle with shredded Parmesan cheese. Serve.  


Thursday, January 19, 2012

Ginger-Chicken Vegetable Fried Rice

In the mood for something a little different? Trying to find a way to "hide" the veggies? Okay, I'm not really trying to hide them as much as I am attempting to use every last one of them before my upcoming 6 week trip.

Here's a tasty fried rice recipe packed full of veggies, chicken & a yummy ginger-sesame flavor!


Ginger Chicken-Vegetable Fried Rice


Ingredients:

½ pound Chicken breasts-diced

4 cups cold Jasmine rice

4 cloves fresh Garlic-minced

¼ cup chopped fresh Ginger

¼ cup toasted Sesame seeds

2 small Carrots-peeled & cubed

2 cups fresh Broccoli-chopped in small pieces

1 cup frozen Peas-heated

1 yellow Onion-diced

3 tablespoons Nam Pla

4 tablespoons Soy sauce

1 teaspoon chili Sauce

2 teaspoons Sesame oil

3 tablespoons vegetable oil

3 Eggs-beaten with a teaspoon of Soy sauce

1 teaspoon white Pepper


Directions:

In a large wok, heat both of your oils, then sauté ginger, onions, and garlic, until golden brown. Add chicken, 1 teaspoon of soy sauce, chili sauce, & 1 teaspoon nam pla. Cook until done. Add the broccoli & carrots. Mix & then cover. Allow to sauté for about 2 minutes. Stir periodically.


Move the chicken & veggies to the side, & add your whisked eggs. Allow the eggs to cook like an omelet-do not mix, except to move your pan to allow all the egg mixture to coat the side of the pan. Once almost cooked, add rice, remaining spices, peas & seasonings, & stir well. Once everything is well combined, cook until rice is heated, then remove & serve immediately.


Winter Versus Us

Tonight was unbelievably cold! Not just cold like Ohhh, brrr, I need a sweater cold, But Holy Shit I might die if my car breaks down cold!

Montana don't play when it comes to winter....apparently. Yeah, I woke up to -20 air temperatures, with a negative 31 windchill. Holy crap balls!

Tonight to combat the freezing temps and pounding of snow, I made my delicious Roasted Sherry Tomato Cream Soup, annnnndddddd.....drumroll please....Caprese Paninis with grape tomatoes, basil olive oil & fresh Buffalo Mozzarella! M,m,m.

Oh and we used the rustic olive oil bread we got this week from Bountiful Baskets co-op!


Roasted Tomato-Sherry Soup


Ingredients

6 Tablespoons Melted Butter

1 whole Medium Onion, Diced

1 -14 ounce can of whole peeled tomatoes-roughly chopped

1 cup water

6 cups Roasted Tomatoes-peeled & blended

3 Tablespoons Chicken Base

3 Tablespoons Sugar

A few pinches of Sea Salt

Black Pepper To Taste

1 cup Cooking Sherry

1-½ cup Heavy Cream

Chopped Fresh Parsley

Chopped Fresh Basil


Preparation Instructions

Sauté diced onions, & basil in butter until translucent. Then add canned tomatoes, blended tomatoes, chicken base, sugar, pinch of salt, black pepper and stir. Cook on medium-low heat for 20 minutes. Remove from heat, & add Sherry and cream and stir. Add in parsley to taste.

Tuesday, January 17, 2012

Coconut Tapioca Pudding

Growing up in Asia, tapioca is a very common dessert. It can also be used as a thickening agent, and you see it commonly used in gelatin style desserts. I just love it because it reminds me of when I was a kid, and it satisfies my craving for something sweet, but isn't too heavy. It's also gluten free! An added bonus!

It's simple, sweet, & delicious...it's also pink. Although it comes in a variety of pretty shades, but is naturally white in color.


Coconut Tapioca Pudding


Ingredients:

1 12 oz. can Coconut milk

½ cup Powdered Coconut Cream

¼ cup Coconut Sugar

2 cups dry uncooked Tapioca pearls

4 cups Water (adjust as needed)


Directions:

On the stovetop in a medium sized pot, bring tapioca to a boil, along with 3 cups of water. Once the tapioca boils, you will want to watch it closely, adding water as it thickens. Reduce heat to low, & stir frequently until the white centers of the tapioca are completely gone.


You will know the tapioca is fully cooked when its consistency is thick & each pearl has increased 100% in size. At this point, you will add the coconut cream to the coconut milk & whisk together in a small bowl. Add the sugar to this mixture, and then add all three to the cooked tapioca. Mix gently, & serve.


Sunday, January 15, 2012

Pear-Ginger-Apple Butter

I was in the grocery store the other day when I overheard a conversation about apple Butter. That reminded me of how much I loved it growing up, & that I had never made it.


After some research & a careful review of the "aging” fruit in my garage pantry, I was determined to make a variation of the traditional apple butter recipe. Still good. But even better. The process of layering flavor upon flavor always adds depth & variety to any recipe. I needed to use apples, pears, & ginger. This seemed like the perfect way to do it. Plus, anything with alcohol in it tastes better.


I am on this big kick not to waste, since we have been participating in the fruit & vegetables co-op on a bi-weekly basis. This challenges me to come up with new recipes to encompass the produce we get,& not let anything go to waste.


Pear-Ginger-Apple Butter


Ingredients

2 pounds apples (preferably Granny Smith)

2 pounds red Pears

1 cup fresh peeled Ginger (cut into thin slices)

1 cup Water

1 cup dark Rum

4 cups Sugar

A pinch of Salt

2 teaspoons cinnamon

1/2 teaspoon ground cloves

1/2 teaspoon Allspice

Juice of 3 Lemons


Equipment Needed

1 wide 8-quart pan (Stainless steel or copper with stainless steel lining)

A food mill or potato ricer

6-8 8-ounce canning jars

First Stage of Cooking:

Cut the apples & pears into quarters, without peeling them. Cut out the seeds. Put the apples, pears, and ginger chunks into large pot (I use my Dutch oven), then add the vinegar, sugar and dark rum. Cover, bring to a boil, and reduce heat to simmer. Cook the apples, ginger and pears about 45 minutes, until they are very soft. Remove from heat.


Ladle the apple-pear-ginger mixture into a potato ricer, or food mill over a medium sized bowl. Add a dash of salt, and the cinnamon, ground cloves, allspice, lemon rind and juice. Taste and adjust seasonings if necessary.

Second Stage of Cooking:

Once you run the entire batch through the potato ricer or food mill, cook the mixture in an uncovered, large, wide, thick-bottomed pot on medium low heat, stirring constantly to prevent burning. I use my Dutch oven. It is perfect for this. Scrape the bottom of the pot while you stir to make sure a crust is not forming at the bottom. Cook until thick and smooth (about 1 to 2 hours).

Canning Steps:

To sterilize my jars for canning, I run them through a cycle in the dishwasher, using very hot water. When your apple-pear butter mixture is ready, pour the mixture into sterilized jars and seal. If you plan to store the apple butter un-refrigerated, make sure to follow proper canning procedures. Before applying the lids, sterilize the lids by placing them in a bowl and pouring boiling water over them. Wipe the rims of the jars clean before applying the lids. I process the jars-sealed, in a boiling hot water bath for 20 minutes to ensure a good seal.


Friday, January 13, 2012

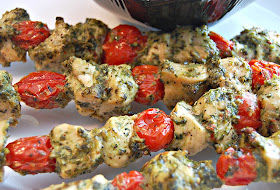
Chicken and Tomato Kabobs with Spicy Cilantro Sauce

This is truly an easy meal to prepare. The best part is that you can make the sauce the night before, throw your chicken into a bag, & let it sit overnight. The next day all you need to do it slide them into the skewers with your tomatoes, & pop them into the oven or onto the grill.

In the summer, we grill these outdoors, but it is just too cold right now. It’s still a nice summery and healthy meal, which we serve over Jasmine rice….and a little of the sauce we saved. The tomatoes get a really flavorful caramelized flavor, and the chicken is delicious when you marinate it overnight. Mmmmmm!


Chicken & Tomato Kabobs with Cilantro Sauce


Ingredients:

1 pound whole, skin removed Chicken Breasts (about 3 chicken breasts)

1 large bunch of Cilantro-Washed, dried & roughly chopped

3 large cloves fresh Garlic-peeled

2 teaspoons ground Cumin

Salt & pepper

¼ - ½ cup Olive Oil

½ Serrano pepper-1/2 seeds removed

1 & ½ quarts Grape Tomatoes

Wooden skewers

Directions:

Begin by adding cilantro, garlic, cumin, Serrano pepper, and salt & pepper to food processor. As you pulse the ingredients, slowly add olive oil. Adjust & increase amount of olive oil as you reach the desired consistency for cilantro sauce. It should be fairly thick, somewhat like a dipping sauce. Retain a small amount of sauce before you add the chicken to use to serve as a dipping sauce the next day.


Cut chicken into bite sized cubes. They need to be thick enough so that they will stay on the skewer. Add cilantro sauce & chicken cubes to a large zip lock bag, and allow to marinade for at least 4 hours, and up to the next day.

 The next day:

Preheat oven to 400. Remove chicken cubes from bag, and alternate a tomato, and a chicken cube in skewers. Rub remaining marinade onto the tomatoes & place in a large greased baking sheet with sides. It should look somewhat like this:


And then this after it's cooked:


Bake for about 25 minutes, gradually turning the chicken in the pan so that all sides cook evenly. Serve immediately with rice, and a side of the sauce.


Wednesday, January 11, 2012

Chipotle Turkey Chili

It snowed ALL DAY yesterday, & this morning was 1 degree. Icicles are covering the patio. I think a warm, hearty turkey chili is in order. Along with a little homemade cornbread....a good hearty bowl of comfort food is just what we needed. Substituting beef for turkey made for an even lighter meal. Enjoy!


Chipotle-Turkey Chili


Ingredients:

4 tablespoons Olive oil

1 pound ground Turkey

1 medium yellow Onion-diced

5-6 cloves Garlic-minced

1/2 teaspoon Penzey’s Chili 3000

1 tablespoon Chipotle Chili

3 tablespoons Hungarian Paprika

2 tablespoons ground Cumin

1 tablespoon ground Ancho chili

1/4 teaspoon ground Allspice

1 can Beans

1 Carrot- peeled and diced

1 Green Bell pepper

6 ounces of dark Beer

2 ½ cups whole peeled Tomatoes-chopped finely (retain juice)

1 teaspoon Oregano

2 teaspoons coarse Salt

4 tablespoon tomato paste

2 tablespoons Corn Masa (corn tortilla mix)


Directions:

Over medium-high heat, sauté onions & garlic till golden brown in olive oil. Add turkey, chili powders, & cumin. Sauté for 5 minutes. Add bell pepper, tomatoes & tomato paste. Cook for an additional 3 minutes. Add beer, beans, water & remaining seasonings. Simmer for 45 minutes on low heat. In the last 5 minutes, add Masa, stirring well to thicken.


Tuesday, January 10, 2012

Chicken-Mushroom Stroganoff

I think everyone has heard me say that my hubby doesn't eat red meat or pork. That still leaves a lot of options for me to cook for dinner, even by eliminating it from our diets. There are so many other options, I find that I rarely miss it.

If I ever do, I may order a steak when we go out, or since we are in Bison country, possibly a spicy Bison burger. That usually satisfies my temporary craving, & I can go back to a seafood, chicken, & fish diet....which by the way, is quite delicious!

One of his favorites is egg noodles, with stroganoff. I replaced the red meat for chicken, and it still hits the spot!


Chicken-Mushroom Stroganoff


Ingredients:

1 pound Chicken breasts-cubed

3 cups chicken broth

3-4 cloves fresh Garlic-minced

1 yellow Onion-diced

2 tablespoons Butter

½ cup red Wine

4 tablespoons All-Purpose Flour

1 & ½ cup low-fat Sour Cream

1 pound Mushrooms-washed & sliced

½ cup fresh Italian flat leaf Parsley-minced

1 teaspoon Herbs de Provence

1-2 large sprigs fresh Rosemary

Salt & Pepper to taste

Olive Oil (for sautéing chicken)


Directions:

In a large pot, heat olive oil & sauté onions & garlic. Add herbs. Cook for about 2-3 minutes or until golden brown, & onions are clear in color. Add chicken, & cook for about 5 minutes. Add salt, pepper, spices, chicken broth, and stir well. Simmer on medium-low for about 15 minutes.


In a small frying pan, melt butter over medium high heat. Add mushrooms & a pinch of salt. Sauté & toss frequently until the edges of the mushrooms caramelize & have a golden brown color. Add to pot with chicken.


In a glass, add wine & flour. Mix well to remove any lumps. Add to chicken, mixing well. Cook for about 2-3 minutes, as the sauce thickens. Mix in sour cream, and then remove from heat. I served my stroganoff over the top of buttered homemade egg noodles.


**Recipe for homemade Egg pasta to follow!